Reverse a released claim with a printed uncashed check
If a claim check has already been printed, you must adjust the claim through the check. First, void the check/register before reissuing the claim.
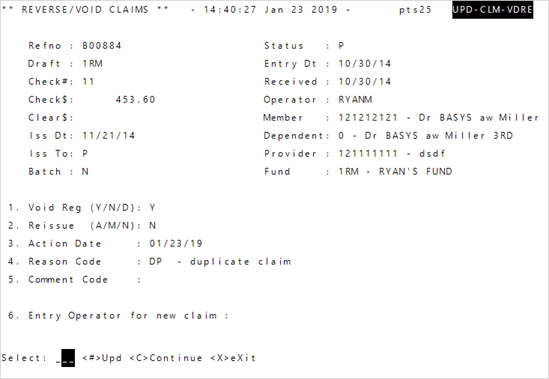
Use the following instructions when a claim is in R—Released status, the check process has run, the check wasn't mailed and the claim shouldn't have been entered (e.g. entered in error, etc.).
Go to:
-
Enter the
DraftandCheck#. You must use a draft and check number to void a check.Hint: To find the claim information, see the Claim Payment tab (see Find claim payment information).- After entering the draft and check number, the remaining fields update and the cursor moves to the
Reissuefield.
Void Reg(Register) is automatically set toY, since the check is printed and you have the uncashed check.
- After entering the draft and check number, the remaining fields update and the cursor moves to the
- Enter
N(No reissue) inReissue. You don't want to reissue the claim since it shouldn't have been entered.- Since
ReissueisN, no claims are reissued and a claim entry session doesn’t display.
- Since
-
Enter an adjustment
 Reason Code
 -
Enter
Cto continue. The original claim refno displays at the bottom of the screen.Hint: Take note of the refnos that display for any necessary additional processing. - Press
Enterand the reversed refno displays. The claim reverses and any informational or error messages display.- All accumulators are automatically calculated and adjusted.
Any informational or error messages display.
-
Press
Enteragain to close the screen.Important! If you accidentally void a released claim, void it again or reverse it: enter the adjusted reference # (ex. A00029 in the example below) in Reverse/Void. Void the reversed claim in the same accounting month and return the first claim to its original status or void the claim again if you're in a new accounting month.
Examples are given for illustration. Other errors can cause the same adjustments.
| Reference # | Paid | Status | |
|---|---|---|---|
| Entered | A00028 | $240.00 | P—Paid |
| Adjusted | A00028 | $240.00 | AP—Adjusted Paid |
| A00029 | -$240.00 | A—Adjusted |
Adjust a released claim with a payment issue
Use the following instructions when a claim is in R—Released status, the check process has run, the check wasn't mailed and there is an over or underpayment.
- Enter the
DraftandCheck#. You must use a draft and check number to void a check.- The remaining fields update and the cursor moves to the
Reissuefield. Void Reg(Register) is set toY, since the check is printed and you have the uncashed check.
- The remaining fields update and the cursor moves to the
-
Enter
M—Manual inReissueto enter the claim correctly.Note: You can't manually reissue checks that have multiple claims' payments. Either void the check and reprocess each claim, or automatically reissue all claims and reverse the reissued incorrect claim and then manually reissue that claim. - Enter an adjustment
Reason Code. The reason code will show in the Adjustment viewport (see Adjustments viewport field descriptions). -
Enter
Cto continue. The original claim refno displays at the bottom of the screen.Hint: Take note of the refnos that display for any necessary additional processing. -
Press
Enterand the reversed refno displays. The claim reverses and any informational or error messages display. - Press
Enteragain and the new claim refno displays at the bottom of the screen. Any informational or error messages display. All accumulators are calculated and automatically adjusted. -
Press
Enteragain to open the new claim.Important! If you accidentally reverse and reissue a claim, reverse the reissued claim and manually reissue another claim. Don’t void or reverse the original reversal (e.g. A00029 in the example below) because a duplicate payment will be created. -
Correct the claim and save it. The claim will be in
R—released status.
Examples are given for illustration. Other claim errors can require the same adjustments.
| Reference # | Paid | Status | |
|---|---|---|---|
| Entered | A00028 | $240.00 | P—Paid |
| Adjusted | A00028 | $240.00 | AP—Adjusted Paid |
| A00029 | -$240.00 | A—Adjusted | |
| A00030 | $300.00 | R—Released |
| Reference # | Paid | Status | |
|---|---|---|---|
| Entered | A00028 | $240.00 | P—Paid |
| Adjusted | A00028 | $240.00 | AP—Adjusted Paid |
| A00029 | -$240.00 | A—Adjusted | |
| A00030 | $200.00 | R—Released |
| Reference # | Paid | Status | |
|---|---|---|---|
| Entered | A00028 | $240.00 | P—Paid |
| Adjusted | A00028 | $240.00 | AP—Adjusted Paid |
| A00029 | -$240.00 | A—Adjusted | |
| A00030 | $240.00 | R—Released |